Published On Mar 17, 2022
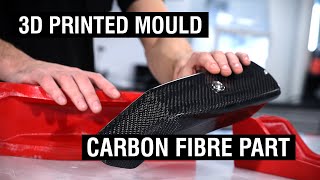
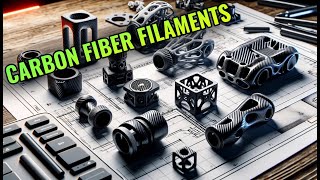
Is it possible to use 3D printed moulds to make Carbon Fiber parts? In this video I go through the steps of making 3D printed moulds using Power PLA from additive heroes to make 3D printed moulds ready to make Carbon Fiber tubes.
I’ve used my Creality Ender 3S1 to create the moulds. Power PLA was used as these have the characteristics of ABS which are, to my opinion, closer to what I need without having to print with ABS. PETG would be suitable as well, but wasn’t at my disposal while making this video.
Link to video’s mentioned in this tutorial:
Lithophane 3D print: • Charizard Pokemon Card Lithophane Res...
Review Creality Ender 3S1: • Creality Ender 3 S1 - Good or bad?! R...
Once printed, I’ve added some bolts and nuts to have a threaded insert that could be used later on. The bolts were coated with some spraycan mould release to ensure a good release of the bolts later on. The nuts weren’t coated to assure a good bond with the TC80 epoxy that will be poured later on.
In this video I’ve used some VAC Cast aluminium filled epoxy resin from @Easycomposites. They now have changed the name to TC80, now Tool Cast resin (Link below to product). Some of the advantages of using this epoxy filled resin is that it has low shrink, higher temp resistance TG, can be poured in bigger volumes.
1.2 Kg was used here for the two mould halves. Keep in mind that this resin has a higher density than water, while calculating the volume you have to add more resin. More information can be found on following product link: https://www.easycomposites.co.uk/tool...
After Casting the resin was left to cure for over 24h before having it’s postcure into the oven. You slowly ramp up the temperature till desired temperatures.
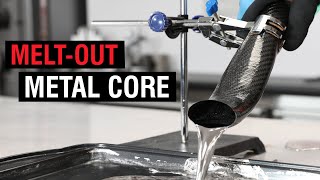
The Silicone intensifier was made using some platinum silicone. A 3D printed mould was used to cast the silicone in. For best results I’ve used spiralize/vase/vaze mode in cura. This way you have a continuous print without seams. Some of the advantages of using an intensifier is that it will expand under heat, creating pressure. It will also leave a good finish on the inside of your part. This means you’ll have controllable thicknesses. An aluminium rod was added to be able to remove the silicone mandrel after the epoxy carbon fiber braided sleeve has cured.
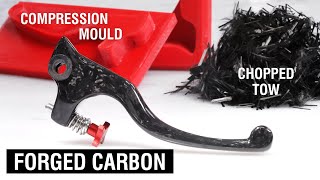
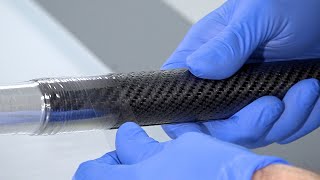
To make the tubes I’ve used a carbon fiber braided sleeve with an average diameter of 40mm (link below to product) I’ve folded the edges on the inside so they have a good finish to start with. You could also cut the carbon fiber strands. Some EL2 (Epoxy laminating resin) was mixed using the fast hardener from Easy Composites. Make Sure to mix well. A small amount is only needed and was applied to the carbon fiber sleeve and a bit to the mould that was pre-coated with some chemical release agent to ensure a good demoulding after cure. The epoxy was applied using a brush.
The Two 3D printed moulds were closed with the carbon fiber braided sleeve and silicone mandrel/intensifier in the 3D printed mouldhalves. That way some pressure is created to create a good surface finish. After the the aluminium rod is inserted using some Vaseline as a lubricant. This aluminium rod will create some more pressure and stability of the Silicone mandrel.
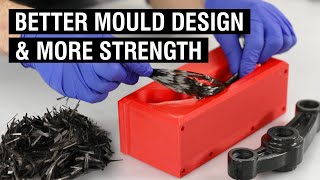
After an oven cure of 6 Hours the 3D printed moulds were removed from the oven and let cooled down. The mould halves were released and the silicone mandrel was removed. Leaving a nice carbon fiber tube. Downside was that when using one layer, some airpockets appeared meaning there was not enough pressure. Two solutions here: increase the diameter of the silicone mandrel/intensifier or add more layers. In this case it was easier to add 2 Layers, creating more wall thickness and thus more pressure. The Results were beter.
In the next tutorial I’ll go through more details on how to finish a carbon fiber part with defects!
Link to to Power PLA from additive heroes: https://www.3dprinthings.be/materiale...
Link to carbonfiber braided sleeve: https://www.easycomposites.co.uk/40mm...
Facebook: / mat2composites
Instagram: matthieulibeert
twitter: @matthieutje65
web/mail: https://www.mat2composites.com
#3DPrint #Carbonfiber #Mould