Published On Jan 29, 2020
DECORATIVE CONCRETE STEP FORM LINERS
PRODUCT DIRECT LINK:https://www.walttools.com/product-cat...
Using a step insert to complete your decorative concrete project is a wise choice. A poorly finished riser on a step or porch will detract from the best stamp job. When approaching a step, a person’s eye is naturally drawn to the vertical portion (riser) of the step and we all know first impressions are important. When step liners are used in the proper manner, that same job will be stunning. The relief and level of craftsmanship simply cannot be obtained by pulling the form early and trying to apply the texture at that point.
Walttools step form liners are incredibly detailed and mimic hand-crafted stonework, slate, or even wood. Concrete form liners for steps will leave you with satisfying clean lines and a high level of realism.
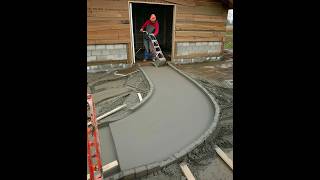
How to Use Step Inserts: The first step to creating decorative concrete steps is framing and bracing. This can get fairly in-depth depending on the step design being implemented (pyramid style, curved, rounded, etc.). Here we are only touching on modifications you may have to make to standard framing techniques to accommodate step liners. Walttools step liner collection is sized to fit standard lumber 2X4”, 2X6”, and 2X8”. In actuality, the width of our liners are 3.5”, 5.25”, and 7.25”. One modification you will almost always make is the bottom step, if poured separate from the slab, it will need to be taller to bring itself into proper alignment with the slab, such as step height plus at least 3.5”. The difference here is you need to fill that bottom void with a 2X4” and then set your liner on that. If you don’t fill the void the concrete will fill under the step form and protrude out farther than the liner. It is not pretty, better than plain concrete, but details make a big difference. If that mistake was made, you could saw cut it back then chisel a bit and the slab will cover the edge.
Decorative concrete steps are created by inserting the rubber concrete step liner into your formwork before pouring. The liners are placed in the formwork flush to the top. The form liners can be held in place with trim nails through the face or screws from the back. Make sure the screws are short enough so they do not go through the texture face of the liner. Next, the concrete step form needs to be released. You can use liquid release, powder release, or Formshield(a water-based release agent) on the step insert depending upon your desired aesthetics. Integral color could be used as the base color and it's added directly into the mixer or ready-mix truck. Next, place the concrete in the mold you created with the formwork and decorative step inserts.
You might encounter a situation where the grade drop doesn’t fall into the standard lumber size. For example, if your decorative risers have to be 6.5” and your inserts fit a 2X6 which is really 5.25”. You will need to cut a piece of lumber for the height difference between 6.5” and 5.25” which equals 1.25”. Nail the 1.25” piece to the bottom face of the 6.5” form. The decorative step insert will fit atop this filler piece and flush to the top of your framed riser. This results in your step face being slightly extended (cantilevered) out in comparison to the 1.25” strip. This effect is quite stunning, even preferred by many. Another tip you might want to follow is to cut the formwork bottom edge to a 45-degree angle to allow more access to the concrete underneath when finishing. This is especially useful when the elevation strip is used. It allows you to finish the tread closer to the riser before pulling the forms (this is definitely helpful when texturing tread.)
You may need to lay down stiffer concrete first, take care not to have the stiff concrete come in contact with faces or come to the top. This is just in case you have multiple steps. Do not just use highly flowable concrete because most likely they will bow, blow out, and or overflow. Top off the stiffer concrete with some flowable (add water or plasticizer to mix). Careful with the plasticizer, it can create bug holes and unwanted voids. Have a person available to vibrate and tap form edges to release any trapped air and improve the continuity of the face.
#decorativeconcretesupply #walttools #decorativeconcrete #concretetexture #concretesteps #decorativeconcretetools #concretetools