Published On Mar 5, 2013
Looking for a stereo or accessories for your vehicle? Use our Auto Fit Guide to find everything for your car.
http://www.sonicelectronix.com/afg?ut...
Learn how to install a car stereo in this simple, step-by-step tutorial from Sonic Electronix. Replacing your factory car stereo is easier than most people think when you follow the basic steps outlined in this video.
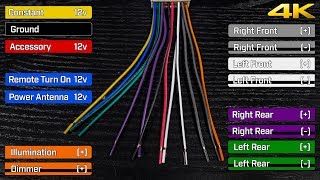
We talk about removing panels, connecting your wire harness, installing a Double DIN stereo (ISO mount), Single DIN (caged mount), and putting the stereo back in.
Step 1: Disconnect the Car Battery
Step 2: Remove the Factory Car Stereo
Step 3: Prepare the Car Stereo to be Installed
Step 4: Run Additional Accessories (Bluetooth Mic, Satellite Radio, etc)
Step 5: Install the Car Stereo
Whether you are a beginner, a hardcore DIY'er, or advanced installer, putting in a new car stereo should be at the top of your list for better sound in your car.
Car Stereos: http://www.sonicelectronix.com/cat_i9...
Car Stereo Installation Accessories: http://www.sonicelectronix.com/cat_i9...
Panel Pry Tools: http://www.sonicelectronix.com/cat_i6...
Sonic Electronix: http://www.sonicelectronix.com/
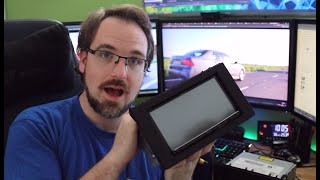
The single DIN touchscreen radio is the JVC KD-AVX77 installed in a 2001 Toyota Celica.
==================================================
step by step installation, replace factory stereo, factory stereo upgrade, aftermarket radio, aftermarket car radio, car radio bluetooth, replace stock stereo, stereo install, radio install, car stereo system