Published On Jul 21, 2023
Check out my 2nd channel, TT Racing: / @ttracingyt
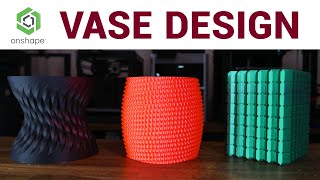
To get the best out of 3D printing, it helps if you can design your own parts. In this tutorial series, we will learn to use a free 3D CAD program to do just that.
In this episode, I demonstrate how to upload and modify STEP files into Onshape to suit our specific needs. This rugged box model is very well designed, so it is satisfying to tweak it to fit different objects. I’m going to do just that for some delicate electronics.
3D design for 3D printing source CAD: https://cad.onshape.com/documents/b54...
0:00 Introduction
3D design for 3D printing playlist: • 3D design for 3D printing tutorials
0:39 Target model
Rugged box (parametric) by Whity: https://www.printables.com/model/2584...
2:00 Use native source CAD files if possible
3:26 Importing a STEP file
4:07 Using transform to position parts
5:03 Selecting segments and expanding them with Move Surface
6:22 Shrinking segments with Move Surface
7:05 Moving features into a new position
8:38 Moving faces in offset mode
9:04 Adding sketches to cut holes or add text
9:31 Printing and testing the remix
PEO patterned bed on Aliexpress: https://s.click.aliexpress.com/e/_DCT...
10:12 Conclusion
Buy quality and affordable filament from X3D. Buy 3, get 1 free and a free sample pack with every order: www.x3d.com.au
Get Quality Resins from 3D Printers Online. 5% off storewide for Teaching Tech subscribers [Code: tech5]
https://3dprintersonline.com.au/
Take a look around and if you like what you see, please subscribe.
Support me on Patreon: / teachingtech