Published On Jul 9, 2023
Follow on instagram: / snowball_engineering
Follow on facebook: / snowballengineering
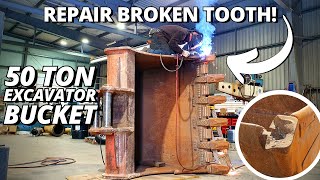
In this video I cut off and replace a bucket wear edge and also weld up and patch the cracks.
So the first job is to turn the bucket upside down and slice down the back of the old edge with the grinder. I also chop 40mm off of the straps to make room for the new edge.
I air arc gouge out the cracks and remove the previous repair patches on the sides. Grind down smooth and then weld up. I cut out some new side plates from 6mm plate to be welded back on in place covering the repaired area.
After welding the side plates on, I cut out some plates to reinforce around the wear pads underneath, these need to be pressed slightly to fit the shape of the roll of the bucket. They are then tack welded on and the pry bar is used to get them to fit tight.
Next job is to turn the bucket back the right way up and then bring the new wear edge in and cut to length, this is a 200x25mm HB500 wear edge.
The bucket is sat onto the workbench and the edge is slid into place. The middle of the bucket has to be winched back straight to line up properly with the new edge. Once checked to make sure its straight and even the edge is tacked into place, I give the edge a little preheat before welding. It’s then fully welded across the front in 11” intervals.
Once cooled down, the bucket is removed from the bench, the remainder of the side plates are welded up then the bucket is turned back upside down to weld up the back side of the edge, this is just stitch welded.
Thanks for watching!
Hope you enjoyed the video.