Published On Dec 3, 2018
Learning how to repair plaster walls and ceilings isn't as hard as you think. But it isn't like drywall and uses very different techniques and materials.
Materials needed:
Don't use straight plaster of Paris. It will set up before you can get it out of the bucket. Use Durabond 90 instead. It's a plaster of Paris based product with premixed retardant. It will give you around an hour of working time. Use general purpose sand for your 1st and 2nd layers. Metal lath and plaster bonder are the two other things you'll need.
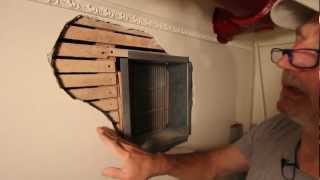
Plaster construction has two parts, the foundation called lath, and the plaster that is spread through it and on top of it.
Lath nowadays is metal screen-like material but earlier construction is thin strips of wood. In both cases the lath is fastened to the ceiling joists or wall studs. When repairing or restoring a plaster surface it's important that the lath is secure and sound.
Plaster can be gypsum or lime based or even a mix of the two. Lime plaster is the oldest type, made by burning limestone in a kiln. The resulting lime is used for plastering and for cement. Gypsum plaster, known as plaster of Paris is also made by heating in a kiln.
Lime plaster is the superior choice especially for kitchens and baths but it's much harder to work with. For general interior work gypsum based materials are a better choice for amateurs.
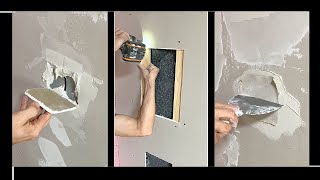
Plastering is usually done in 2 or 3 coats. You can spread the coats out over a few days or even do them all on the same day. The existing plaster and lath needs to be slightly damp. Each coat of new plaster should be misted with a squirt bottle before the next coat is applied as well.
The first coat, called the scratch coat, is a mixture of sand and plaster. In older homes it often had horse hair or other fibres to help it stick to the lath. Applying the scratch coat is tricky. The plaster is more or less squeezed through the holes or gaps in the lath. Lots of it can end up on the floor or on your head.
The second coat goes on much easier as most of the holes and gaps in the lath will already be filled in. This coat is a mix of sand and plaster as well. This coat should sit a bit below the final surface to leave room for the finish coat.
The finish coat is straight plaster. It should be fairly thin, perhaps a ¼ inch or so. Before laying this coat it's a good idea to scrape down any areas of existing plaster that have sand stuck to them. You can see me do this with the edge of my float in the video several times. Doing this will keep sand out of the finish coat. Hopefully you can get a nice smooth surface with your trowel on your first attempt. Doing so will save you a lot of very difficult sanding once everything is hard and dry.
What people say https://drewathome.com/reviews/
Check out https://drewathome.com/listings to see available properties.
For schools see https://drewathome.com/kitchener-wate...
Check out my buyers' guide https://drewathome.com/buyers-guide
Get mortgage information here https://drewathome.com/financing
Andrew Shackleton, Broker
Royal LePage Wolle Realty
519 578 7300
226 600 1548
[email protected]
https://drewathome.com