Published On Feb 28, 2024
This video covers an introduction to the Anycubic Slicer with an explanation of settings ive found useful. Overall, I have to say the Anycubic Slicer is pretty OK. Remote print is a love hate relationship, but also the reason I keep coming back.
00:00 Intro, build plate and volume
01:30 Orientation, scaling, cutting objects
08:36 Paint on Supports (better than auto generate)
14:02 Print Settings - Layers and perimeters
22:32 Avoid knocking off supports - Z-Hop and retraction
26:42 Print Settings - Back to layers and perimeters
32:49 Print Settings - Infill
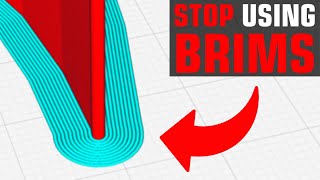
37:50 Print Settings - Skirts and brim
42:55 Print Settings - Support material
49:56 Print Settings - Speed
54:30 Print Settings - Advanced
56:08 Filament - Filament settings
58:15 Filament - Filament settings - Pressure advance
01:02:56 Filament - Cooling, advanced, retraction
01:03:48 A note on saving settings
01:04:46 Printer - General
01:06:30 Printer - Machine limits
01:08:38 Printer - G-Code
01:15:25 Remote Printing
01:18:37 Settings montage
Scraper shown in the video : https://makerworld.com/en/models/1295...
8080 Extrusions shown in the video : https://www.printables.com/model/7557...
Start G-Code I use :
G90 ; use absolute coordinates
M83 ; extruder relative mode
M140 S[first_layer_bed_temperature] ; set bed temp
M190 S[first_layer_bed_temperature] ; wait for bed temp
M104 S180 ; warmer extruder temp
M107 ; Set Fan Off
G28 ; move X/Y/Z to min endstops
M420 S1 ; load mesh
G1 Z0.28 ; lift nozzle a bit
G92 E0
G1 Y3 F2400 ; zero the extruded length
M104 S[first_layer_temperature] ; set extruder temp
M109 S[first_layer_temperature] ; wait for extruder temp
G1 X180 E40 F500 ; Extrude 25mm of filament in a 5cm line.
G92 E0 ; zero the extruded length again
G1 E-0.2 F3000 ; Retract a little
G1 X181 F4000 ; Quickly wipe away from the filament line
M117