Published On Nov 17, 2020
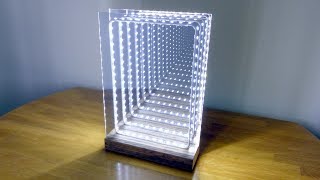
I fitted a LED strip in an old stylish table, I beforehand completely renovated. It was not a regular RGB strip, but one with the WS2813 LED/chips fitted. That means that the LEDs are controllable, and as a controller to do so, I chose the SP107E. To power it all, I mounted a 15000 Ah powerbank. So the whole layout is very simple: the powerbank delivers 5 volts through USB to the controller, and from the controller four wires go to the strip, two for power (also 5 volts) and two for data. The SP107E is controlled via Bluetooth, with an app on the phone, that is called 'LED Chord'. As you can see in the video, the SP107E is capable to visualize music too, therefore it has a microphone (so you can 'play' it by tapping on the table with your fingers), but there is a 3,5 mm input jacket too. The powerbank can be charged through a USB cable that is always connected in the powerbank for that purpose. Easiest is to stick it in a laptop that is on the table (of course you can stick it in an adapter as well). The charging LEDs in the powerbank are visible under the table.
I needed a bit less than 6 meters of the LED strip for this table, there are 26 LEDs on the short sides of the table and 53 LEDs on the long sides, so a total of 158 LEDs. Because the upper limit of the SP107E is 150 LEDs per segment, the table has two segments of 79 LEDs each (they start in two far corners). I chose for the LED strip with 30 LEDs per meter (you can get them too with 60 or 144 LEDs), because I was afraid more LEDs would overload the powerbank.
The LED strip set me back some 40 euros. The SP107E was about 12 euro, the powerbank 30. Some two years ago I bought the second hand table for 100 euros.
For anyone wondering, the cat's name is Ior (pronounce Eeyore, like the Winnie the Pooh Donkey).
(I disabled those annoying non-skippable video ads and mid-roll ads for this video - you can thank me for that.. :-)
CONTENT
0:00 - 0:57 Intro
0:57 - 1:23 First step: taking apart
1:23 - 3:04 Second step: cutting for strip
3:04 - 4:59 Step three: putting in the strip
4:59 - 6:32 Step four: removing wood
6:32 - 7:43 Step five: mounting devices
7:43 - 9:44 End Result
9:44 - 10:23 Fun with table
LINKS
LED strip: https://www.tinytronics.nl/shop/nl/ve... (you should really Google it - many shops have it for sale)
SP107E controller: https://nl.aliexpress.com/item/330188...
(this one too: really, Google it)
Powerbank: https://www.allekabels.nl/powerbank/1...
CONTACT
facebook - / onrust1
instagram - / onrust1
MUSIC
00:02 - 07:43 - English Country Garden - Aaron Kenny
07:43 - 08:06 - Eyes of Glory - Aakash Gandi
08:06 - 09:23 - Nimbus - Eveningland
09:23 - 09:44 - Symphony no. 5 - Beethoven
09:46 - 10:23 - Boogie Woogie Bed - Audionautix
Boogie Woogie Bed from Audionautix is licensed under a Creative Commons Attribution 4.0 License. https://creativecommons.org/licenses/...
Artist: http://audionautix.com/
All the used music is for free available in the YouTube Audio Library
TRANSLATING
Volunteers who want to translate my videos are still very welcome! I will add your name to the description of the video you translated, and will add a short text - maybe with your contactdetails? Ready to do a translation? Contact me, my email address is on the 'About' page here: / onrust1
Write me an email telling me which video you want to translate and in what language, and I will send you an automatic translation of that language you can edit.
French Translation by Raphaël.
This video was edited with Lightworks - https://www.lwks.com/
#woodworking #onrust1 #artproject #art