Published On Nov 28, 2017
You will need: Resene testpots in Resene Alabaster and Resene Blue Lagoon, Resene FX Nightlight, cardboard, masking tape and three paint brushes.
1. Use a round plate or something similar to draw a circle in the middle of the cardboard.
2. Cut the cardboard in half and cut along the circle of each half. Tape together to create the circle cut out in the middle. This will be your moon template.
3. Tape the cardboard to the wall, and roughly paint with Resene Blue Lagoon. Leave to dry.
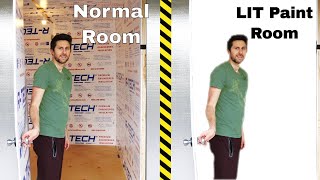
4. Repeat with Resene Alabaster. For the Resene FX Nightlight shines brightly in the dark, it needs to have a white background behind it. Leave to dry.
5. Touch up with Resene Blue Lagoon to create the craters. Leave to dry. We painted two more moons, using Resene Sunshade and Resene Juniper.
6. Apply the Resene FX Nightlight. For the best result, apply three coats, leaving 45 minutes-1 hour between coats.
7. Leave it to 'charge' in UV light during the day, and enjoy your new galaxy wall at night when the lights go off.
See more great DIY ideas at www.habitatbyresene.com/tips