Published On Jan 5, 2024
⚡⚡⚡⚡Amazon Products:⚡⚡⚡⚡
👍 Outdoor Ubiquiti UAP-AC-M AC Mesh AP: https://amzn.to/41S6l5i
👍 Indoor Ubiquiti UAP-AC-PRO-E AP: https://amzn.to/41JzFea
👍 CAT6 Direct Burial Cable: https://amzn.to/3gOAmdb
👍 TP-Link 8 Port Gigabit PoE Switch: https://amzn.to/48kVa7y
See more information, product links and a transcript of this video on my Blog: http://www.hometechdiy.com/ubiquiti-o...
Hey Guys,
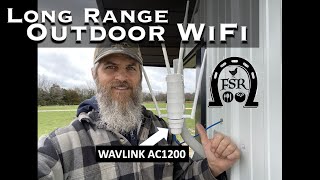
Today we are installing this Ubiquiti access point outside on my shed to extend my mesh Wi-Fi network so I can have strong, reliable internet in the shed and around my 2 acres of property. We’ll start off by looking at what’s included. Then we’ll add it to my network and get it configured and tested before installing it outside. Lastly, we’ll do some speed tests followed by a winter update.
You guys may remember, I installed a couple Wi-Fi access points in my house. They continue to work perfectly and to see this install and their settings, do watch that video. The problem is, I don’t have a strong Wi-Fi signal from my house to the inside of my shed. I often hangout there and work on projects. The signal could also be improved all around the yard. It’s nice to be connected to listen to music or chat with my folks on Facetime. It’s also important to note that I have an Ethernet buried cable to my shed, that I’ll be taking advantage of. Links for the cable I used and the access points can be found in the description below.
So, opening this up, we have the user manual, the access point itself, the install bracket and mount followed by the 2 antennas. There is also a power cord and PoE injector. Lastly a couple install screws and zip ties.
If we pop open the cover on the bottom of the device, we have an Ethernet port. This is where I’ll connect it to my network from my PoE switch. That switch will also provide power to the access point. There is also a reset button in here that, if pressed once will power cycle the device and if held for 5 seconds, will restore it to factory settings.
The mount that I’ll be using has a little level and once it’s on the mounting surface the bracket on the back of the device slides right in. I show how the included PoE injector works, if you don’t have a PoE switch.
Now that I have the access point connected to my network, let’s pop open Ubiquiti’s Unifi manager. Again, I have the manager installed because I have 2 other devices online, as you can see here. The new AP is gets picked up and adopted into my mesh network. This means, the settings from the other APs are getting copied to the new device. I don’t need to configure anything here. The network name is included so I can go from inside my house to outside and stay on the same network, with no hiccup. The firmware get auto updated in this process.
Next, I restart an AP and watch the devices that were connected to it, jump over to the new one.
We attached the mount to my shed and plug in the AP. This cable is an underground cable so it’s thicker than normal. And, I’ll create a drop loop and wrap the wire around the top of the mount and into the shed. And here is how it looks with the door shut, perfect. Now time for some range tests.
Let’s run to the back corner, 300 feet away. This is Starlink speed test. I am most interested in the speed from my phone here to my network. These numbers here are the speed from my network to the Internet, so will skip that part. I want the speed from my network to my phone. Cool I think I saw 126, that’s pretty impressive at this distance. And the upload hit 137 for a second before stabilizing at about 27. Now, we’ll go down the street and find the edge of the Wi-Fi boundary. Ok here we are and my phone has been switching from Wi-Fi to cellular. The signal is weak, but let’s give it a try. It’s about 600 feet away in my neighbor’s yard. You can barely see the shed through the trees. I keep bouncing off the network and onto the cellular one. Ok, one Wi-Fi bar, let’s start the test. Cool, so the speed from the router to the internet is still, good, so I’ll fast forward over this. And here is the download speed from the router to my phone. 10 or so is pretty good. Much slower, but still not bad. Oh. No. Looks like I slipped out of range. Kinda expected when you’re pushing the range limits, but overall, I couldn’t be happier.
Alright guys, it’s a few months later and the access point is still working perfectly, even in these freezing temperatures on the Canadian prairies. I’ve had no issues listing to music over Wi-Fi while riding around to all corners of the 2 acres on my lawn tractor and I’ve setup my phone down here to stream IPTV and it’s been flawless. I hope you found this video helpful, if so, give me a thumbs up and please show you support by subscribing to my channel. Thanks for watching.
Chapters:
00:00 Introduction
01:15 Unboxing
02:12 Configuration
03:45 Install
04:36 Speed Test
06:15 Final Thoughts