Published On Nov 14, 2020
STL files: https://morleykert.com/shop/3d-printe...
Since we're spending so much time at home these days, indoor plants have become a vital part our life. I've wanted to combine 3D printing and concrete ever since I got my printer, so when I thought of making concrete planters with reusable, 3D printed molds, I knew it was the perfect project! I had no idea that casting directly against 3D printed molds would work so well, and I hope that this technique inspires you to make some wild, unique planters - perfect for a holiday gift!
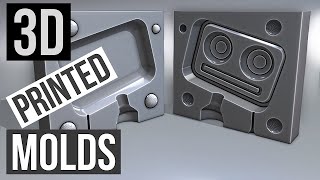
I designed the planters in Fusion 360. Before modelling the actual planter, I made sure to accurately model the plastic container that I would use to form the inner cavity, so I could check that the concrete would be sufficiently thick. I sketched out a general profile for the planter, used the loft tool to build the basic shape, and then created the textured surface by using a dense pattern of spheres as a cutting tool. Once I was happy with the shape, I could use it as a virtual positive to create the 3D printable negative molds.
Since I wanted this mold to be reusable, I opted for printing it in PETG, rather than PLA. PETG is both stronger and less brittle than PLA, so I didn't have to worry about it breaking during the demolding process.
I printed the pieces on my Prusa i3 MK3S using 0.10mm layer heights, and each of the four mold piece took 6 hours and 45 minutes to print. Even though I printed at that relatively high resolution, the surfaces still had that "3D printed texture", so I gave each one a light sanding with 220 grit sandpaper. I had no idea how strongly the cured concrete would adhere to the mold pieces, so I wanted to give myself the best possible chance of success.
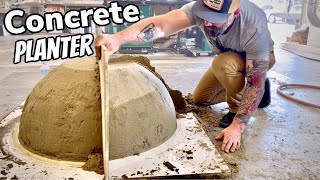
The mold pieces are really simple to assemble with hot glue, though I had to triple check that each pieces were in the correct spot to ensure the pattern at the edges would be continuous. I just used a plastic container hot glued to a bottle cap to form the inner cavity with a drainage hole. Next time, I think I'm going to use a more tapered container to form the inside, so that the hole can be wider at the top. Maybe a small, disposable plastic planter?
I sealed up all the inside edges with silicone, let this cure for 24 hours, and was ready to cast some concrete.
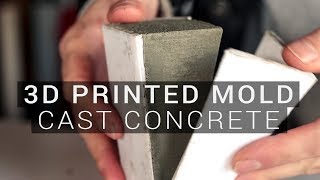
I used Quikrete Crack Resistant Concrete Mix for this project, which is a 4000 psi fiber-reinforced mix. Since this is a relatively small mold, I sifted out the small aggregates before casting. I also filled the inner mold with water, so that it wouldn't try to float to the surface of the concrete and break free from the base.
After 24 hours of curing, I de-molded the planters. This took a bit of elbow grease, but the first planter taught me where to apply leverage, so de-molding the second planter was a whole lot easier and faster. If you're designing your own mold, you could actually add integrated handles to the 3D printed mold pieces to make de-molding even easier! After knocking off the sharp edges with some sandpaper, I submerged each planter in a water bath to finish curing for 24 more hours.
I'm so excited that the mold pieces are reusable. After slicing off the hot glue/silicone and a quick wash in the sink, they were ready to go for round two. If you wanted, you could print a couple copies of this mold and become your own planter factory!
I love the modern, subtly textured look of these planters. They are perfect for some cute succulents, and add a unique touch to any chic space. But more than anything, I am so excited about this project as a proof of concept. The possibilities with 3D printed molds is truly endless, and I will definitely be diving further down this rabbit hole.
This project is my entry into the #QUIKRETE1BagWonder contest. You can check out the contest details at the below link, and be sure to follow the hashtag to see all the rest of the amazing projects!
https://www.quikrete.com/one-bag-wonder/
Thanks for watching :)
Become a patron: / morleykert
TOOLS/MATERIALS I USED IN THIS VIDEO (affiliate links):
Dial Calipers: https://amzn.to/3kvtrHF
PETG Filament: https://amzn.to/3pv9xjt
Silicone: https://amzn.to/2IGMVeQ
OLFA Utility Knife: https://amzn.to/2IDUSkZ
Prusa i3 MK3S 3D Printer Kit: https://shop.prusa3d.com/en/51-origin...
Quikrete Crack-Resistant Concrete Mix: https://www.quikrete.com/productlines...
OTHER TOOLS I LIKE TO USE: https://www.amazon.com/shop/morleykert
ONLINE STORE: https://morleykert.com/shop
FIND ME ON...
Instagram: / morleykert
Twitter: / morleykert
On these podcasts! : https://anchor.fm/into-the-spotlight and https://clamp.buzzsprout.com/
Tik Tok: https://vm.tiktok.com/xSfbdj/
and at https://morleykert.com/
Music by Epidemic Sound: https://www.epidemicsound.com/referra...
#modern #design