Published On May 16, 2022
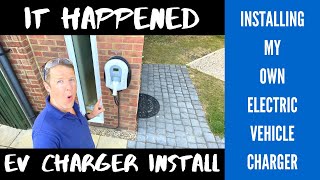
Electric Vehicles are becoming more and more popular on a daily basis. Maybe you own one yourself or know someone that does. Either way, one of those vehicles are going to need a way to charge their batteries. In this latest episode of Electrician U, Dustin walks us through the process of installing an electric vehicle charging receptacle in a residence.
🤘⚡️MEMBERSHIP⚡️🤘
JOIN ELECTRICIAN U - become a member and get:
FREE Continuing Education every year
FREE Practice Exams
FREE Monthly Video Courses
FREE Weekly Live Instructor-Led Classes
FREE Monthly Educational Newsletter
Premium Members-Only Content
Private Discord Channel
Monthly Members-Only Discord Chats
Sign up here --- https://www.electricianu.com/electric...
🎧🎹MUSIC AND VIDEO:🎹🎧
/ descantmv
🎬✍️ART AND ILLUSTRATION:✍️🎬
https://www.daverussoart.com
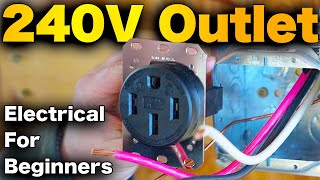
For most EV chargers a Nema 14-50R receptacle will be used. Most of us have probably seen one of these receptacles before in our homes. They are the same ones used for the oven! These receptacles are rated for 50 amps at 250 volts.
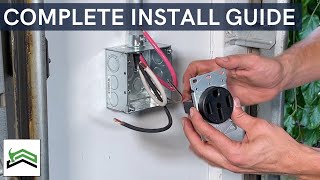
The very first step in the process would be to hire a professional electrician to install the receptacle. Now this would not only be for the non-electrician, but also for an electrician lacking the experience of installing this type of circuit. The second step in the process would be to remove power from the panel you will be installing the wiring to, so we aren’t working in a hot panel. Once we have that done, we need to figure our WHERE the new receptacle will be placed so the two-gang box can be installed. If you are installing the receptacle in an existing house, you will most likely be installing an old work box (sometimes called a pop in box). A tip here is to use a PENCIL (not a marker) to draw the outline of where you want to put the box. That way if there is a stud or other obstruction, you can shift the location to adjust and not have an unsightly pen mark left over!! To finish this portion of the installation, simply cut out the substrate to expose the void in the studs the size of the box you just marked, and you are ready to install the wiring!
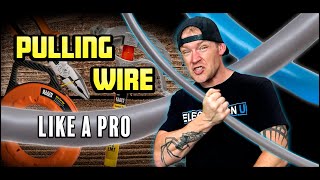
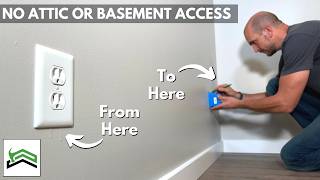
For this installation, Dustin is using 8/3 NMC. So, it has 3 #8 conductors (2 hots and 1 neutral) along with a #10 bare copper ground. The cable will need to be fished down the wall to the box location. This will result in you having to go DOWN to the location where you cut the hole in the wall and reach inside the wall cavity to grab hold of the cable and pull it out of the hole. Once the cable is out, simply knock out one of the tabs in the box and pull the cable thru it and secure the box to the wall. Make sure you do not Over tighten the screws on the wings so those little tabs don’t break off.
Once the box is installed and wire is in place, then carefully remove the outer insulation from the NMC with a sharp razor knife. Don’t put pressure on the cable with the knife, just let the blade score the insulation gently so it can be removed. Next, remove just enough insulation for each conductor to go into the port on the receptacle. Put those stripped conductors into their respective ports on the receptacle itself and then tighten them down (making sure you are not over or under tightening them). Carefully fold the conductors back into the box and secure the receptacle to the box making sure that the bare copper ground wire is NOT contacting any other exposed metal parts of the receptacle or the exposed wires.
The last couple of steps must be repeated (sort of!!) on the other end to get the cable into the panel. Once the wire is into the panel and the connector tightened, the wires simply need to be landed into their respective places. The black & red conductors will be put on the breaker and the white goes to the neutral bar while the ground to the ground bar. Put the panel cover back on and you are ready to reenergize the panel and test the receptacle! Never walk away from an installation without testing what you just installed!! If you test the appropriate voltage at the receptacle, you are good to go with the installation and can call it done!
We hope this has been helpful in explaining the general steps in installing an EV receptacle. What type of installation would you like to see in a video? Leave comments below in the comment section! Please continue to follow Electrician U as we are constantly adding new content to help our followers along in their careers.
#dustin stelzer #electrician #electrical #electricity #tesla daily #chevrolet bolt euv # kia niro ev