Published On Apr 3, 2022
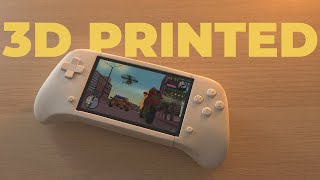
Today we are making the Raspberry Pi Pico GameBoy, a DIY game console that looks like the original Nintendo Game Boy released in 1989! But the comparison stops here.
For less than $20, you can make your own game console and start coding games!
Retro games are probably the funniest way to learn how to program!
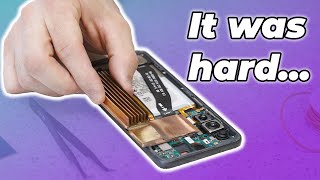
The Pi Pico GameBoy is a DIY game console based on the $4 Raspberry Pi Pico microcontroller. The Raspberry Pi Pico GameBoy can be programmed in MicroPython, a special version of Python made for Microcontrollers, or in C++ for better performance.
The screen is a 1.54 inch LCD display with a resolution of 240x240 pixels and 65K colors.
There a 6 buttons: 4 for the DPAD + 2 action buttons. The buttons are 6x6x6mm micro push buttons. The sound is provided by a simple piezo buzzer. The case and the buttons have been designed in Fusion 360, a 3d modeling software from AutoDesk. The case is 3D printed and is about 3:4 of the original Nintendo Game Boy: It fits nicely in the pocket! Do you remember how big the original Nintendo Game Boy was?! The buttons are kept at a 1:1 scale otherwise they become too small for “old kids”!
⏰ Chapters ⏰
0:00 Raspberry Pi Pico Game Boy
0:16 Features
1:04 Cover & buttons design
1:19 3D printing
1:39 Electronics
3:07 Assembly
➡️ 3D printed parts
https://www.youmaketech.com/fk5w
➡️ Step-by-step tutorial, circuit diagrams, parts needed, source code:
https://www.youmaketech.com/raspberry...
➡️ Music: "Rinse Repeat" by DivKid