Published On Mar 4, 2023
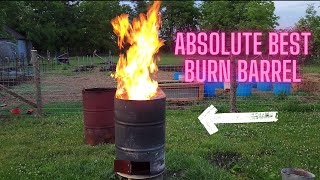
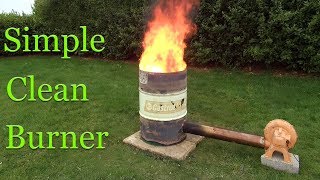
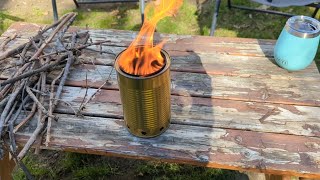
How to build a DIY Smokeless Burn Barrel. Inspired by @BuildingStuffIsFun • Smokeless Burn Barrel
Tools & Parts Used
Milwaukee Grinder : https://amzn.to/3y6RqWJ
Grinder Discs : https://amzn.to/3kI7ew4
Irwin Tools Unibit 4 (3/16" - 7/8") : https://amzn.to/41I1NO8
Milwaukee Drill : https://amzn.to/3y47Ten
Channellock : https://amzn.to/3IMgcAe
Self Taping Screws : https://amzn.to/3y48pJl
Ratchet Straps : https://amzn.to/3KOiemf
Sharpie Marker : https://amzn.to/3SHNHbA
We would love to hear from you :
📫The Kraemer Life, PO Box 69, Parrottsville, TN 37843
📧 [email protected]
Ways to support our channel:
Like 👍, Comment ✍️ and Share our videos on social media.
🚛 Amazon Wishlist: https://www.amazon.com/hz/wishlist/ls...
☕️Buy us a Coffee: https://www.buymeacoffee.com/thekraem...
👕Shop our Bonfire Merch store : https://www.bonfire.com/store/the-kra...
Barrel 1:
Measuring from the seam 5 & 6 inches out. Making the 5In line a solid line in the 6in line dotted. The 6in dotted line goes all the way to the top edge.
Cut through the solid 5in line and the seam in the center of the barrel.
Use a ratchet strap in the center to hold it together. finished cutting the seam and the 5in line down the length of the barrel. cut the gap between the 5in line and the dotted 6in line at the top of the barrel, including the lip of the barrel, remove the 5in strip from the center of the barrel.
take off the bottom of the barrel, including the lip. The ratchet strap holds it all together so it doesn't lay out flat.
Overlap the cut to that one inch dotted line using the ratchet strap to hold it together and screw it together with self tapping metal screws.
Put the barrel upright.
Using a 3.5 inch square template, mark around the top edge of the barrel. Label all even squares. On squares 4, 10 & 16, cut the sides and the bottom. Don't cut the top where the lip is at the top of the barrel. Bend those inwards and upright to 180 deg.
Bend the three legs into a U shape.
For the rest of the even tabs, cut the top, the bottom and one of the sides. Make sure the side that you start with on the first square is the same side that you cut on the remaining even squares. Bend those tabs inward at a 90 degree angle. Make sure that these tabs are all flowing the same way around the barrel.
Turn the barrel upside down and mark a horizonal line 1.5 inces from the top and three inches from the top around the edge. Mark a vertical line every inch along the top, going down to the first horizontal line. Cut each of those marks. Bend each 1 inch by 1.5 inch tab inwards at 30 deg.
On the second horizontal line, drill a pilot hole below the center of each tab. Using the Irwin Unibit, drill out each pilot hole to ⅞ inches.
Put Barrel 1 aside
Barrel 2 :
Turn the barrel upright. Mark two horizontal line around the barrel, one at 1.5 inches and the other at 3 inches. On the first horizontal line, drill a pilot hole every 1 inch. On the 2nd horizontal line, drill a pilot hole half way between the two pilot holes above it. (the two rows of pilot holes are staggered by 1/2 )
Drill out each pilot hole with the Unibit to ⅞”
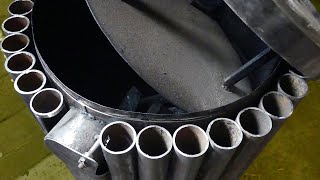
Turn the barrel upside down. Cut out the bottom leaving a 1 inch lip inside the bottom of the barrel. Keep the Barrel upside down and place it over Barrel 1. The Tabs of Barrel 1 should be at least 1 inch above the lip of barrel 2.
With 3” metal screws, screw from the outside of barrel 2 to the legs of barrel 1, so the legs are pulled to the inside edge of barrel 2. Do this to all 3 legs.
Using the bottom plate of Barrel 2, cut off about ½ from the edge.
Make a 3” circle in the very center of the plate and a circle around the outside edge of the plate about 1” from the outside edge.
Divide the plate into 8 sections, using straight lines that pass from each edge through the center of the plate. It should look like you have 8 pizza slices.
Mark every other pizza slice (4 in total).
On each of these 4 slices,
Cut along the outside round edge (1 inch from edge of plate), the inside round edge (edge of the 3” circle and the right-side straight line. Don’t cut the left-edge straight line.
Turn the plate upside down, and bend up each of the 4 sections where the left-edge line would have been.
Turn the plate right side up (the tabs are facing downward now) and place that into the burn barrel. The tabs at the bottom of Barrel 1 will hold this plate in place.
Take the bottom of Barrel 1
Make a 3” circle in the center, and as many additional circles, each 1-2 inches wider than the next. Then split the plate into at least 12 “pizza slices” with straight lines that go from edge to edge through the center. . Each place the straight lines and curved lines intersect, drill out with the Unibit for a ⅞” Hole. This will be your grate for the top of the barrel.
#thekraemerlife #diy #smokelessburnbarrel