Published On Jul 29, 2021
In this class, Bryan teaches the Kalos techs how to diagnose the low-voltage electrical components of a heat pump and a straight-cool system. This video is the second part of our series on Residential Low Voltage HVAC Troubleshooting.
Techs often make mistakes when stripping wires. When you strip a wire by wringing it with your stripper’s jaws, you can nick the wiring. Generally, you’ll want to make a small split in the casing and gently use your wire stripper to pull back on a conductor you won’t use. That way, the casing will strip away quite easily, and you won’t risk nicking any of the important wires.
When routing wires into a heat pump, make sure that you keep those wires away from the air handler. The indoor coil can become quite hot in heat mode and damage the wires. You will also want to avoid vibrations and sharp edges that could damage the wire.
You can ohm out your wires to look for open areas in a circuit that’s not energizing. Before you attach any wires to the HVAC system, you can check for breaks in the path with an ohmmeter. You do that by connecting all of your conductors together and putting your meter leads on two different conductors at the same time. If you have an “open” reading (infinite ohms), you have an incomplete path. You DON’T do this test if you have a blowing fuse.
Wires that are exposed to the sun or excess heat can lose their colors. You can figure out those colors if you connect them to ground while each color is connected to the system.
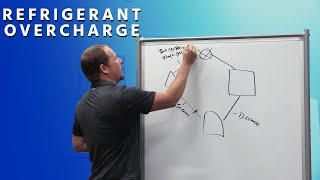
When we begin diagnosing Bryan’s heat pump system, Aaron first checks to see if the blower is running (it is). He then checks if the compressor fan runs (it does). Aaron also ensures that the thermostat is on and the refrigerant is flowing through. However, the system is supposed to be in heat mode but is cooling. The reversing valve was being energized when it wasn’t supposed to be. Instead of checking behind the thermostat’s face with a meter, the team pulled the battery out to make sure there’s no 24v power. The system appears to have a popped fuse. After the team takes their readings, they use the Short Pro to confirm if the fuse blew. Sure enough, a 3-amp fuse blew due to a short.
Bryan’s team looks for the short using Eric’s method: using an ohmmeter on a de-energized circuit. They look for an ohm reading near 0 on the wire nuts, and they determine that the short is in the G conductor. When the team energizes the system without the G conductor, the system does NOT run as normal due to the thermostat’s overload protector. Then, the team disconnects the wires from each other and decides to connect each one to the 24v power supply individually. After turning the system on to test it, the team discovers that the orange wire (reversing valve solenoid) is not energized. Since the orange wire is connected to the contactor coil, the team decides to check for an open circuit. There is an open circuit between the thermostat wire leading from the air handler to the condenser. The team checks the ohms from the orange wire to another working wire (yellow) for confirmation.
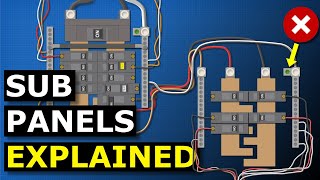
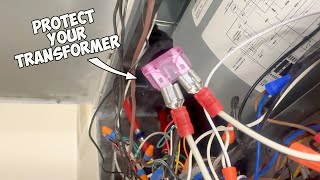
When we begin diagnosing Bert’s straight-cool system, the thermostat is blank. The team quickly notices that there is an open switch that has turned the power off. However, the thermostat remains blank after closing the switch. The team decides to check the transformer where it connects to the circuit board. They set their multimeter to pick up voltage between hot and common. The team discovers that no voltage is coming out of the transformer, and they trace the problem further to the power supply (L1). No power has been going to the board OR the transformer. The team checks for loose connections; there are no loose connections, but some of the switches are off.
Bert’s team checks the incoming power, and the main breaker is off. Once power is restored, the condenser doesn’t come on. It looks like the thermostat’s time delay keeps repeating, so the team works to bypass the thermostat by putting a wire nut on R, G, and Y. The blower doesn’t work, and the team notices an error code. The blackened fuse indicates that a short occurred and blew the fuse. After ohming out the fuse, the team can confirm that the equipment has blown a fuse. The Short Pro indicates that the short occurred on Y.
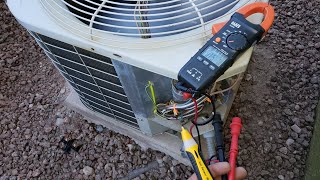
When Bert’s team checks the yellow wire at the condenser, the meter doesn’t indicate that there’s a path on the yellow wire. There may be an issue with the contactor coil, so the team checks the ohms on the contactor (0.6 ohms). After checking the ohm reading against a brand new contactor (12 ohms), the team determines that the resistance is extremely low; too much current went through the system and led to the fuse blowing and the time delay resetting.
Check out information on the 2022 HVACR Training Symposium at https://hvacrschool.com/symposium/.
Read all the tech tips, take the quizzes, and find our handy calculators at https://www.hvacrschool.com/.