Published On Jun 22, 2020
Learn how to detect objects inside a game window in real-time using OpenCV.
Full tutorial playlist: • OpenCV Object Detection in Games
Grab the code on GitHub: https://github.com/learncodebygaming/...
0:37 WindowCapture updates
3:28 Integrating findClickPositions()
5:18 Updating main
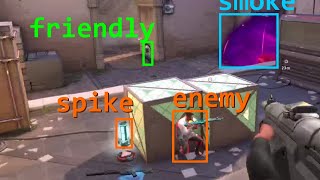
7:20 Demonstration of real-time detection working!
7:59 Creating a Vision class
14:12 Browser game demonstration
15:56 Shortcomings of this object detection
Read the full written tutorial with code samples here: https://learncodebygaming.com/blog/re...
In the first three parts of this tutorial series, we learned how to use OpenCV's matchTemplate() to detect objects inside an image. Then in part #4, we learned how to quickly capture screenshots and display them as a video stream inside of an OpenCV window. Now we're ready to combine together everything we've learned so far in order to detect objects in real-time.
We could reuse our WindowCapture class completely unchanged from the last tutorial, but I want to make a few improvements to it. First let's save this class to its own file if you haven't done so already: windowcapture.py.
I'd like to convert the list_window_names() member function into a static method. This is done by adding the @staticmethod decorator above the method definition, and removing self from the parameters. The reason you might want to do this is that it allows us to call this function at any time without first instantiating an object, like this: WindowCapture.list_window_names(). You'll find this to be more convenient. Note that we can only do this because list_window_names() does not reference any class properties.
I've also changed the constructor to accept None for the window_name. When given no window name, we'll have WindowCapture just capture the entire screen. I've found that certain applications return a black screen (Chrome), or do not update after the initial image capture (Firefox), and capturing the entire screen can be a suitable fallback plan in those cases.
Let's also save our findClickPositions() function to its own file. I've called mine vision.py.
A few alterations need to be made to findClickPositions(). This function will now be processing an OpenCV image returned by WindowCapture instead of reading an image from a file. To account for this, we'll change the second parameter from haystack_img_path to just haystack_img, and we'll remove the cv.imread() call. In the debugger portion of this function, we'll also want to remove cv.waitKey(), as this is now handled in our main loop (as covered in part #4). That same block of code should also no longer fall under the if needle found conditional, because we want to update the image stream with cv.imshow() even when no matches are found.
Our main.py file will also pick up from where we left off in part #4. We simply need to swap out our cv.imshow() call with a call to findClickPositions() instead.
The first parameter in findClickPositions() is the needle image we want to search for. You'll want to manually take a screenshot and crop out the item you want to match (like we did in part #1). For the second parameter we'll pass in the screenshot returned by WindowCapture's get_screenshot(). Then set your threshold, and enable one of the debug modes.
Now when you run main.py with your game client open, you can see your object being detected in the OpenCV window in real-time! Move your character around a bit to test the effectiveness of this detection.
Before we discuss some of the limitations and shortfalls of our object detection, let's first make some improvements to our vision.py code. I want to convert this into a class, to keep everything more organized as we improve upon what we have.
We'll call our new class Vision, and let's read in the needle image in the constructor so that we don't need to repeat that step during every iteration of our main loop. We can also assign our matchTemplate() comparison method here. This will allow us to use different methods for different visions.
We'll want to make findClickPositions() a method inside of the Vision class. To do that, get your tabs right, and remember to add self as the first parameter. We also no longer need the needle_img_path parameter in this function, nor the other steps that are now handled by the construtor. Remember to update all usages of those variables that are now class properties to use self.. I'm also going to take this opportunity to change this function name to simply find().
Now we need to update our main.py to work with our new Vision class. Update the import, and then we can initialize our vision object before starting the main loop. Inside the main loop, we can now call find() on that vision object, passing in the latest screenshot from WindowCapture.
Continue with the written tutorial here: https://learncodebygaming.com/blog/re...