Published On Apr 25, 2019
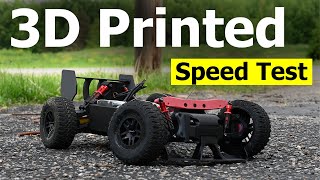
I designed the tank in a way that it can be almost completely 3D-printed. It's of course inevitable to truely completely 3D print the tank so there are small additional parts needed like bearings, shafts, screws, bolts and nuts. The tracks however are completely 3D-printed and don't need little shafts between every link. They are designed to snap together and stay together. It's very hard to take them apart after they snapped together, which is of course the intention.
I initially used 2 12V 1000 RPM motors but they turned out to be to weak so I ordered some new motors which were the same size but instead of 1000 RPM they are now 100 RPM. If I wanted to put bigger motors in it, I had to completely redesign the tank which would take up to much time as I already 3D-printed all the parts.
The 2 motors are currently being driven by 1 L292n motor driver which is controlled by an arduino nano V3. The arduino reads the data from 2 channels on the spektrum receiver. I might replace the arduino and motor driver by 2 car esc's but it's also possible I keep the arduino so I can connect some sensors to it so I can make the tank perform tasks autonomously.
In front of the tank is a camera which is placed inside an "eye" so the driver can look up and down. The up and down movement of the "eye" is obtained by a standard 9g servo. The video feed gets transmitted through a 600mW 5.8gHz transmitter and gets send to some FPV goggles.
The hatch on top of the tank gets hold on by 2 neodymium magnets (1 in the body, 1 in the hatch).
STL and Fusion 360 source files can be found here: https://bbprojects.technology/collect...
More info can be found here: https://bbprojects.technology/blogs/p...
My PayPal: https://paypal.me/BrockenBrian
Tools used for this project:
SMD rework station: https://www.banggood.com/YAOGONG-8878...
PLA filament: https://www.banggood.com/Creality-3D-...
Recommended 3D-printer: https://www.banggood.com/Creality-3D-...
Components used:
1 × Arduino nano
link: https://www.banggood.com/Geekcreit-AT...
1 × L298N motor driver
link: https://www.banggood.com/Wholesale-Du...
1 × RC receiver
link: https://www.banggood.com/2_4G-6CH-S60...
1 × 9g servo motor
link: https://www.banggood.com/TowerPro-SG9...
1 × FPV camera
link: https://www.banggood.com/JJA-CM1200-1...
1 × Heat shrinks
link: https://www.banggood.com/328pcs-Heat-...
2 × Neodymium magnets
link: https://www.banggood.com/8pcs-N52-20x...
4 × 5mm bearings
link: https://www.banggood.com/10pcs-685ZZ-...
2 × 12V 100RPM geared motors
link: https://www.banggood.com/DC12V-100RPM...
6 × M5 nuts
2 × M5 treaded rod about 50mm long
42 × 4.5 X 40 mm wood screws
I used about 42 4.5X40 mm screws and cut them to lenght when necessary.
If you're wondering how I do what I do and how you can get started creating your own prototypes I wrote a basic guide about it.
Part 1: Mechanical design can be found here: / basic-guide-to-start-developing-your-own-p...
► Music Credit: DJ Quads
Track Name: "Downtown Funk"
Music by: Dj Quads @ / aka-dj-quads
Official YouTube Channel HERE: / channel
SoundCloud HERE: / aka-dj-quads
Twitter HERE: / djquads
Spotify HERE: https://open.spotify.com/artist/2VZrd...
Instagram HERE: / djquads