Published On Sep 19, 2014
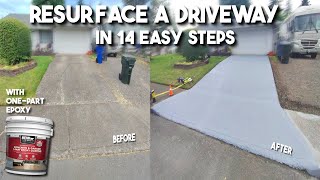
Learn how to repair and resurface an asphalt driveway from home improvement expert Ron Hazelton. For more projects, visit Ron Hazelton's website: http://www.ronhazelton.com/
*The Dupot Re-Surfacer Ron uses in this video is no longer available. You can use this product in its place MACMAT-AR 5-Gal. Asphalt Re-Surfacer, Model # X9510.
Transcript:
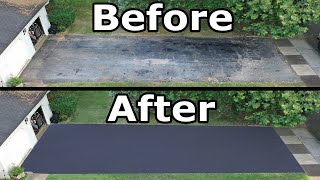
I've been noticing that my driveway is in pretty rough shape, there are spots like this that are badly eroded, cracks pretty much everywhere and you know with winter coming on, it's just going to get worse. Water will enter places like this, freeze and expand and by next spring, I'm going to have a real mess here. So I want to do something about it now.
Sealing a driveway is a job that at first I thought I'd have a professional come in and do but then I came across a relatively new product from Dupont that I think is going to be easy enough to apply that I believe I'll do it myself
Before anything can go on my driveway some things have to come off; dirt and debris, algae and weeds.
I'll start with the weeds. I'm always amazed at how well these guys can do in a pavement crack.
Next I loosen the debris that's collected in the wider cracks using a wire brush.
Then it's time for the big sweep. Now I could use a broom, but my leaf blower will do a great job of cleaning out the cracks, then clearing everything off the surface quickly.
To get rid of the algae, I pour a gallon of household bleach into four gallons of water, dip a scrub brush in the solution and apply the bleach and water mixture. A heavy scrubbing is really not necessary here, I'd rather let the chemicals do the work. I let the solution set for about 10 minutes, then rinse with fresh water. Well, I've got the hose out. I use the nozzle to flush out any material in the cracks that the blower left behind.
The final cleaning I do with a pressure washer, you might consider this option, but this machine does a terrific job of removing dirt and the way I see it, The cleaner, the surface, the better anything I put on top will stick.
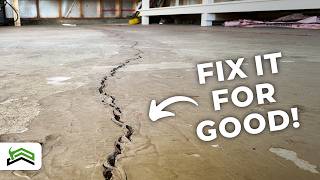
Well, the surface is clean and the algae is gone, but before I can put any kind of sealer on this driveway, I'm going to have to deal with these damaged areas. The erosion right here and all of those cracks,
Narrower cracks, up to a half inch wide or so can be most easily filled using a liquid elastomeric filler like this one. I like to cut the tapered nozzle about a quarter inch wide. The idea here is to move backward, away from the tip, slightly overfilling the crack. You may have to speed up or slow down, depending on how deep or wide the crack becomes. Once the filler is in place I like to take a two inch putty knife and flatten the bead, spreading the material over the adjacent surface.
The eroded areas need to be filled using a paste like trowel grade filler. I find that it's easier and less messy to use a wide putty knife to remove the material from the bucket and distribute it on the surface. Then I switched to a trowel to smooth the filler and blend it at the edges. The trowel grade filler also works well on sunken in areas like this and larger cracks up to one inch wide.
No, I'm not trying to emulate a Jackson Pollock painting, I'm applying a bonding agent and sealer on top of what had been an oil stain. I washed the surface area first with a degreaser, now I'm spreading the sealer evenly over the surface. It will dry clear.
Now, this is the sealer or resurfacing that I'm going to be using today, it's by Dupont and it's asphalt with polymers added. Now that combination will ensure that it sticks well to the old surface, it remains flexible, reducing the likelihood of cracking, resistant to the ultraviolet sun rays and it will also be highly resistant to gas and oil spills. On top of that, it has sand added to it. That will give me better traction here on the driveway.
The resurfacer needs to be mixed thoroughly before using. Now I could do this by hand, but a paddle mixer and a cordless electric drill is much faster, easier and less messy. My first application tool will be a four inch wide paint brush. With this, I'll apply the material around the edge of the driveway, being careful to keep it off the cobblestone border.
Now here is where a second person helps a lot. Teela Keller, a friend of mine, has agreed to lend me a hand on this next phase. She's pouring the resurfacer on the driveway ahead of me while I follow behind with a wide squeegee spreading it out evenly. Now, there is definitely a technique here. The idea is to move in a continuous back and forth pattern, always working with a wet edge.