Published On Jul 8, 2014
So the point of this video was to just demonstrate the various steps of some the effects in OMEn. Obviously I didn't get to show all of them (I showed something like 15 out of 106 here), but I wanted to make something that anyone could watch and understand. It's specifically not detailed. I purposely didn't put any text or labels because I didn't want to distract viewers.
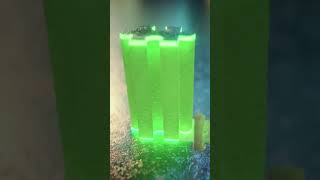
My process was to show the final shot, followed by the raw untouched shot (filmed with a RED Epic in 5K), and then the stabilized shot (if necessary), followed by the projection map (painting out a person in 3D space), and then various effects layers and smoke simulation renders and tests. Then I end the shot with the final effects, with a wipe to the final color graded shot.
All of the compositing was done in Adobe After Effects, with editing done in Premiere Pro. The smoke was simulated with a plugin for 3DsMax called FumeFX (love this plugin). The sparks were done using an After Effects plugin called Particular. I tracked the various shots using either After Effect's built in camera tracker, or Boujou. You can also use the freely available Autodesk MatchMover, which is pretty sweet.
Projection maps! So the shots where you see a person get painted out, is called projection mapping. Basically I am projecting a "clean plate" onto various surfaces/geometry in 3D space. It's a more advanced version of tracking a 2D clean plate. Because the camera is in motion, there's parallax in the image, so 2D tracking a clean plate simply doesn't work. Different parts of the image move at different speeds. Projection mapping allows you to basically rebuild the space as it actually exists (more or less) in real life, so you get realistic motion of the clean plate.
Stabilizing! This was all done using After Effects' built in Warp Stabilizer function. Everything was shot at 5K resolution, so I had lots of room to be able to crop in without losing detail. Keep your shutter speed/angle high enough so that you don't get motion blur in the shots, and stabilizing will make the shots super steady. Just be careful not to get warping (very easy to do). If that happens, stabilize the shot less. Even just 1-2% can make a lot of difference.
Smoke! So everything was simulated using FumeFX, which is a plugin for 3DsMax, a 3D modeling and rendering a program. I would basically import the tracking and camera data from the shots into the program and then model some geometry so that it represents the scene. I would then iterate a LOT with the smoke simulations until I got motion that I liked. Then I'd simulate at a low spacing (basically high quality) with the function "Wavelet turbulence" turned on, which basically lets me run a higher resolution simulation on top of the current sim (to get technical it just subdivides the voxels).