Published On Premiered Nov 13, 2020
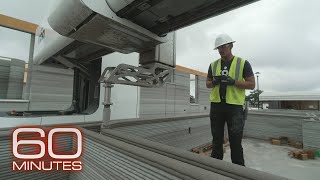
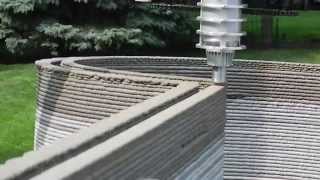
Recently I had the incredible opportunity to be one of the first Americans to see the 3D printed fibonacci house under construction by Twente Additive Manufacturing. Maybe you saw it in the video I posted last week.
Submit a project I should feature!
https://automate.construction/upload/
Automate Construction Podcast
https://open.spotify.com/show/189kgzG...
Newsletter & Blog
https://automate.construction/
Write an Article for www.Automate.Construction
https://automate.construction/upload/
How I make money
Virtual Village - https://automate.construction/virtual...
“How to 3D Print a House” Course - https://automate.construction/course/
Book a Consulting Call - https://jarettgross.youcanbook.me/
MY EQUIPMENT
Camera - https://amzn.to/3NqPSMl
Vlog Mic - https://amzn.to/3OyrzO6
Podcast Mic - https://amzn.to/3udRTVF
Tripod - https://amzn.to/3bCNIw5
Japanese Handsaw - https://amzn.to/3bCNIw5
https://www.twente-am.com/
https://www.automate.construction/12-...
Music by Cam Wayne: / @camwayne3977
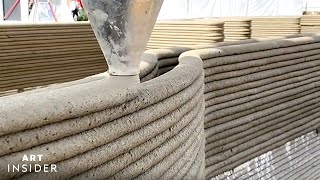
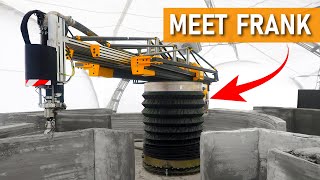
I also got to explore their facility and watch a few prints. I took the opportunity to ask pointed questions about the process so that I could compile the golden nuggets of knowledge directly from the experts during a print to share with you. For this weeks video, I have made an instructional introduction to operating a concrete 3D printer. There is a lot going on and so this short video barely scratches the surface of the various challenges one can face with different prints. Like Jim Ziemlansky says every print is different and with those differences come different challenges. At this point Jim has racked up many hours on the machine and is highly knowledgeable.
To understand what is involved on a basic level, here are the steps I’ve contrived from my observations during my time in the Twente Additive Manufacturing facility.
1) Design
2) Test Run of first layer
3) Choosing 1K vs 2K material
4) Filling the mixer
5) Dialing in the details
6) Material consistency testing
7) Water Content Testing
8) Backpressure
10) Watch for problems
11) Insert rebar & lifting hold
12) End the print gracefully