Published On Jan 13, 2024
edit: Sorry for the wonky orientation of the video. The video was edited on my phone and didn't realize how weird it looked after uploading.
Thanks for checking out my first video! I'm awkward and very new to this so apologies for all the ums lol. Also, audio got cut down pretty bad when uploading I will make sure to fix that in future videos to prevent it from being so quiet.
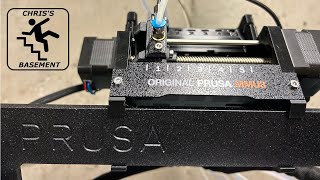
I hope this helps give some guidance to those who were in need of some help when installing this! Huge shout-out to Bill from https://www.3dchameleon.com/ for all of the help and support with getting this running.
Correction: 3:58 The motor with the holes for the filament is the driver motor. The side without the holes is the selector motor. I realized I made that part sorta confusing hope this clears things up!
link to the K1/K1 Max mounts
https://www.printables.com/model/6535...
Link to splitter mount I made:
https://www.printables.com/model/7793...
Spool holder used in this video
https://www.printables.com/model/6728...
Affiliate links!
Screw driver set used in this video:
https://amzn.to/48Pg3Yn
M3 screw kit for diy 3D printers!
https://amzn.to/49aCiIz
#3dprinter #creality3d #3dprinting #crealityk1 #3dchameleon #crealityk1max